# 6. Flowing water lamp
## 6.1.Overview
In this section, you will learn how to use three LED lights to achieve a running water effect.
## 6.2. Working principle
As in the previous section "Traffic Light Project", the LED on/off is controlled by controlling the high/low level of the three
LED light pins. After setting the waiting time for on and off, you can see the lighting process of the three LEDs one by one,
simulating the effect of running water lamps.
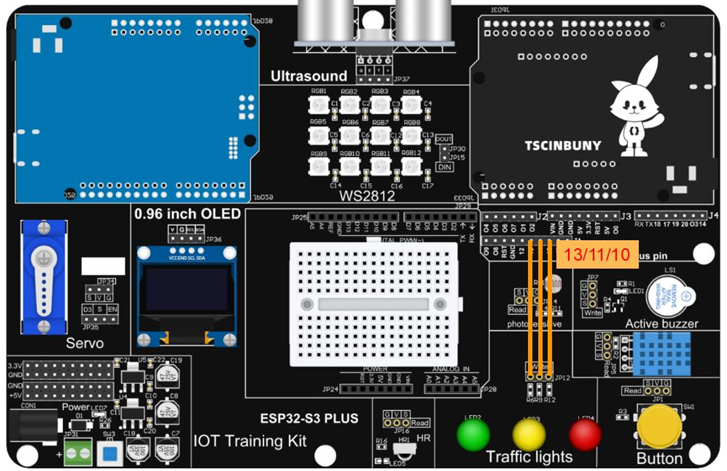
## 6.3 Connection lines
 ## 6.4 Upload code
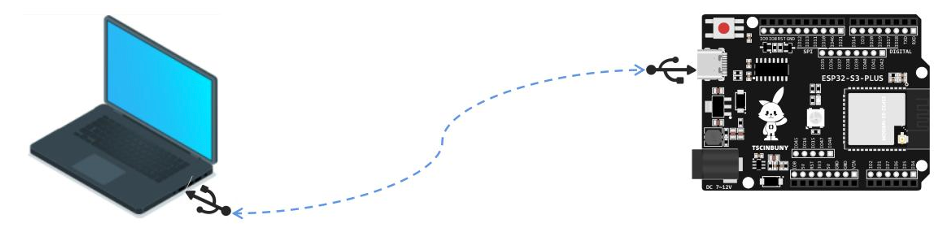
### 6.4.1 Connect the main control board to the computer using a USB cable
## 6.4 Upload code
### 6.4.1 Connect the main control board to the computer using a USB cable
 ### 6.4.2 Open the program file (path: 2_ESP32_S3_PLUS\ Lesson_6_Flow_light )
Also select the board type as ESP32S3 Dev Module and select the COM number newly displayed when the USB is plugged
in . Then click "Upload" to start compiling and uploading the program to the main control board.
## 6.5 Code analysis
Define three LED pins and operating modes
```cpp
#define Green 13 // Define the green light pin
#define Yellow 11 // Define the yellow light pin
#define red 10 // Define the red light pin
void setup() {
// Define the pin as the output working mode
pinMode(Green, OUTPUT);
pinMode(Yellow, OUTPUT);
pinMode(red, OUTPUT);
}
```
Within the loop function, each LED light is lit individually at intervals of 200 milliseconds
```cpp
void loop() {
digitalWrite(Green, HIGH); // Turn on the green light
digitalWrite(Yellow, LOW); // Turn off the yellow light
digitalWrite(red, LOW); // Turn off the red light
delay(200); // Turn on the green light for 200 millisecond
digitalWrite(Green, LOW); // Turn on the green light
digitalWrite(Yellow, HIGH); // Put out the yellow light
digitalWrite(red, LOW); // Turn off the red light
delay(200); // Turn on the green light for 200 millisecond
digitalWrite(Green, LOW); // Turn off the green light
digitalWrite(Yellow, LOW); // Turn off the yellow light
digitalWrite(red, HIGH); // Turn on the red light
delay(200); // Turn on the green light for 200 millisecond
}
```
### 6.4.2 Open the program file (path: 2_ESP32_S3_PLUS\ Lesson_6_Flow_light )
Also select the board type as ESP32S3 Dev Module and select the COM number newly displayed when the USB is plugged
in . Then click "Upload" to start compiling and uploading the program to the main control board.
## 6.5 Code analysis
Define three LED pins and operating modes
```cpp
#define Green 13 // Define the green light pin
#define Yellow 11 // Define the yellow light pin
#define red 10 // Define the red light pin
void setup() {
// Define the pin as the output working mode
pinMode(Green, OUTPUT);
pinMode(Yellow, OUTPUT);
pinMode(red, OUTPUT);
}
```
Within the loop function, each LED light is lit individually at intervals of 200 milliseconds
```cpp
void loop() {
digitalWrite(Green, HIGH); // Turn on the green light
digitalWrite(Yellow, LOW); // Turn off the yellow light
digitalWrite(red, LOW); // Turn off the red light
delay(200); // Turn on the green light for 200 millisecond
digitalWrite(Green, LOW); // Turn on the green light
digitalWrite(Yellow, HIGH); // Put out the yellow light
digitalWrite(red, LOW); // Turn off the red light
delay(200); // Turn on the green light for 200 millisecond
digitalWrite(Green, LOW); // Turn off the green light
digitalWrite(Yellow, LOW); // Turn off the yellow light
digitalWrite(red, HIGH); // Turn on the red light
delay(200); // Turn on the green light for 200 millisecond
}
```