image ling cdn |
||
|---|---|---|
| .. | ||
| Lesson_13_Infrared_change_RGB.ino | ||
| README.md | ||
README.md
13. Infrared remote control RGB
13.1 Overview
In this section , you will learn how to use an IR remote control with an IR receiver . Complete a project to switch RGB light colors via infrared remote control.
13.2 Working principle
The universal infrared remote control system consists of two parts: sending and receiving. The sending part is composed of infrared remote control, and the receiving part is composed of infrared receiving tube. The signal sent by the infrared remote control is a series of binary pulse codes. In order to avoid interference from other infrared signals during wireless transmission, it is generally necessary to modulate at a given carrier frequency and then transmit through an infrared emitting phototransistor. The infrared receiving tube filters out other noise waves, receives only the signal of a given frequency, and restores it to a demodulated binary pulse code. The built-in receiving tube converts the light signal sent by the infrared light-emitting diode, amplifies the signal through the amplifier in the IC, and restores the original code sent by the remote control through automatic gain control, band-pass filtering, demodulation, and wave formation, and outputs the signal through the infrared receiving module Pins identify the circuits that enter an appliance. The encoding scheme that matches the infrared remote control protocol is: NEC protocol. Next, let us understand what the NECprotocol is.
(1) 8 address bits, 8 sequence bits address bits and sequence bits are transmitted twice to ensure reliability (3) Pulse position modulation (4) The carrier frequency is 38 kHz (5) The time for each bit is 1.125 ms or 2.25 ms
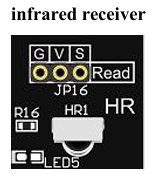
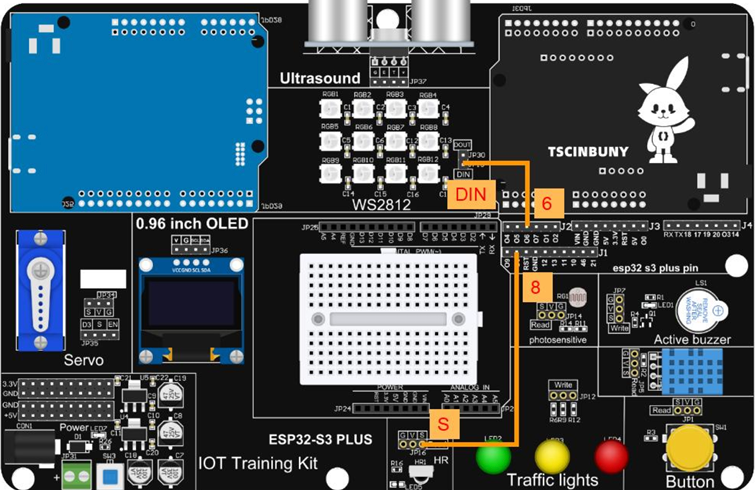
13.3 Connection lines
13.4 Upload code program
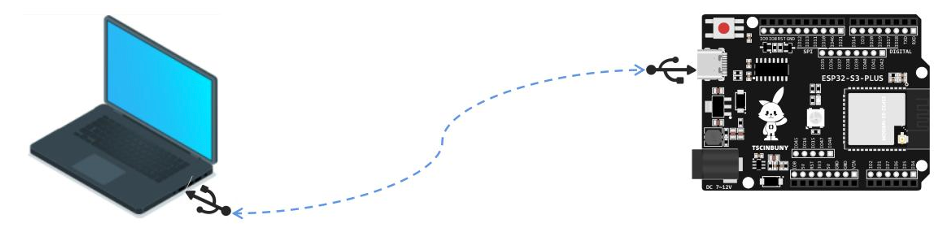
13.4.1 Connect the main control board to the computer using a USB cable
13.4.2 Open the program file ( Path : 2_ESP32_S3_PLUS \ Lesson_13_Infrared_change_RGB )
Also select the board type as ESP32S3 Dev Module and select the COM number newly displayed when the USB is plugged in . Then click "Upload" to start compiling and uploading the program to the main control board, and wait for the program upload to be completed .
After the program is uploaded, point the infrared remote control at the infrared receiver and press the number keys 1/2/3 to control the WS2812 to switch lights of different colors.
13.5 Code analysis
Declare the required library files. If the corresponding library is not added, please go back to the installation library to see how to add the library.
/* esp32 by espressif system 라이브러리 필요 v2.0.17 빌드 가능
  Irecv 이슈
*/

#include <IRremoteESP8266.h>
#include <IRrecv.h>
#include <IRutils.h>
#include <FastLED.h>
Define ws2812 pins, number of lamp beads, brightness and other parameters and variables hue, Color
#define LED_PIN     6           // Define the WS2812B RGB lamp pin
#define NUM_LEDS    12          // Define the number of beads
#define BRIGHTNESS  5           // Defining the brightness of the light
#define FRAMES_PER_SECOND  120  // Defines frames per second
CRGB leds[NUM_LEDS];            // WS2812B LED
static uint8_t hue = 0;         // Sets the value of the color
int Color = 1;                  // A variable that defines the color pattern of the light
Define the infrared receiver pin as 8, instantiate the infrared receiver object as irReceiver, and receive the infrared information object pointer results.
//const int IR_RECEIVE_PIN = 8;   // Infrared receiver connected to GPI8 pin
const int IR_RECEIVE_PIN = 20;
IRrecv irReceiver(IR_RECEIVE_PIN);
decode_results results;
Initialize the infrared receiver and ws2812, set the baud rate to 9600
void setup() {
  Serial.begin(9600);
  irReceiver.enableIRIn();                                  // Enable infrared receiver function
  FastLED.addLeds<WS2812B, LED_PIN, GRB>(leds, NUM_LEDS);   // The LED on the LED strip is added to the controller using the FastLED library
  FastLED.setBrightness(BRIGHTNESS);                        // Set the light brightness
}
The loop function determines whether an infrared signal is received, and compares the received infrared signal code with the three instruction code values to obtain three color modes.
void loop() {
  if (irReceiver.decode(&results)) {        // If you receive an infrared signal
    Serial.println(results.value, HEX);  // Print the numerical value of the infrared signal

    if (results.value == 0xFF30CF) {
      Color = 1; // If key 1 is pressed, the color mode is red
    }else if(results.value == 0xFF18E7){
      Color = 2; // If key 1 is pressed, the color mode is green
    }else if(results.value == 0xFF7A85){
      Color = 3; // If key 1 is pressed, the color mode is blue
    }
    irReceiver.resume(); // Continue to receive the next signal
  }
Three color modes are obtained according to the received infrared encoding information, and the corresponding color can be obtained by judging the value of the color mode variable Color. Let ws2812 display this color again.
  for (int i = 0; i < NUM_LEDS; i++) {
    if (Color == 1) {
      leds[i] = CHSV(hue, 255, 255);        //set it to red
    } else if (Color == 2) {
      leds[i] = CHSV(hue + 85, 255, 255);   // set it to green
    } else if (Color == 3) {
      leds[i] = CHSV(hue + 170, 255, 255);  // set it to blue
    }
    FastLED.show(); // Displays the color of the LED
    FastLED.delay(2 / FRAMES_PER_SECOND); // Delay to control the frame rate
  }
}