image ling cdn |
||
|---|---|---|
| .. | ||
| Lesson_12_DHT11_OLED_display.ino | ||
| README.md | ||
README.md
12. DHT11 temperature and humidity sensor
12.1. Overview
In this tutorial, we will learn how to use the DHT11 temperature and humidity sensor. It's accurate enough for most projects where you need to detect humidity and temperature readings. Again, we will use a library specifically designed for these sensors, which will keep our code short and easy to write.
12.2. Working principle
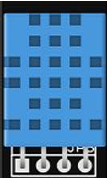
12.2.1. DHT11 temperature and humidity sensor
- humidity:
- Resolution: 16Bit
- Resolution: ±1% RH
- Accuracy: ±5% RH at 25℃
- Interchangeability: Interchangeable
- Response time: 6S under 1/e(63%) 25℃, 1m/s air condition
- Hysteresis: <±0.3% RH
- Long-term stability: <±0.5% RH/year
temperature:
| Resolution | ±2℃ | Lag | <±0.3% RH |
| Repeatability | ±0.2℃ | Response time | 10S at 1/e (63%) condition |
| Interchangeability | Interchangeable | ||
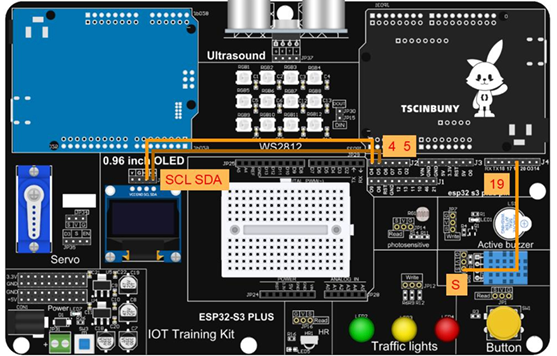
12.3 Connection lines
12.4 Upload code program
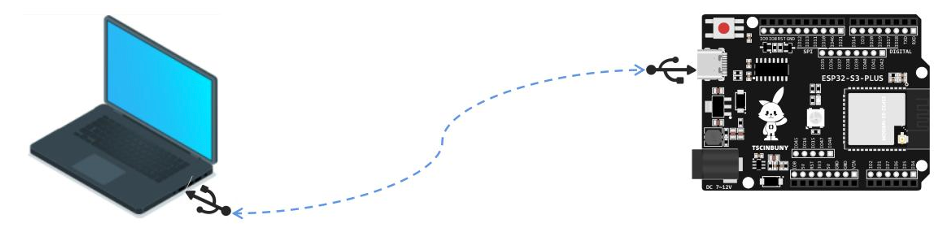
12.4.1 Connect the main control board to the computer using a USB cable
12.4.2 Open the program file (path: 2_ESP32_S3_PLUS\ Lesson _ 12_DHT11_OLED_display )
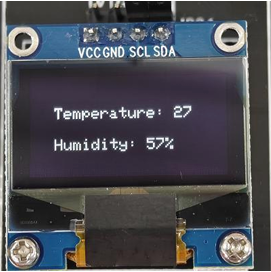
Also select the board type as ESP32S3 Dev Module and select the COM number newly displayed when the USB is plugged in . Then click "Upload" to start compiling and uploading the program to the main control board, and wait for the program upload to be completed . After the program is uploaded, you will see the temperature and humidity values ( when the screen does not display correctly, you need to check the SCL/SDAwiring, or press the motherboard reset button to reset the program ).
12.5 Code analysis
Declare the required library files. If the corresponding library is not added, please go back to the installation library to see how to add the library.
#include <Wire.h>
#include <Adafruit_GFX.h>
#include <Adafruit_SSD1306.h>
#include <DHT.h>
Define the pixel parameters of the OLED screen and instantiate a screen object display
#define SCREEN_WIDTH 128  // Define the screen width to be 128 pixels
#define SCREEN_HEIGHT 64  // Define the screen height to be 64 pixels
#define OLED_RESET -1     // Define the OLED reset pin to -1 (or -1 if the reset function is not used)
// Create an Adafruit_SSD1306 object that controls the OLED screen, specifying the screen width, height, I2C bus object, and reset pin
Adafruit_SSD1306 display(SCREEN_WIDTH, SCREEN_HEIGHT, &Wire, OLED_RESET);
Define DHT11 sensor pins and instantiate DHT objects as dht
#define DHTPIN 19           // The DHT11 sensor is connected to digital pin 4 of the Arduino
#define DHTTYPE DHT11      // The DHT11 sensor was used
DHT dht(DHTPIN, DHTTYPE);  // Create DHT objects for connecting DHT sensors, specifying sensor pins and sensor models
Set up the initialization bus, OLED screen and DHT11
void setup() {
  Serial.begin(9600);
  Wire.begin(5,4);  // The initial I2C bus SDA pin is set to 5 and the SCL pin is set to 4

  // Initializing the screen
  if (!display.begin(SSD1306_SWITCHCAPVCC, 0x3C)) {
    Serial.println(F("SSD1306 initialization failed"));
    for (;;)
      ;
  }
  display.clearDisplay();  // Clear the screen buffer
  dht.begin();             // Initialize the DHT11 sensor
}
Read the temperature and humidity values in the loop function, save them to variables, and then display them on the OLED screen.
void loop() {
  // Read the temperature and humidity data
  int humidity = dht.readHumidity();
  int temperature = dht.readTemperature();
  display.clearDisplay(); // Clear the screen buffer
  // Display temperature and humidity data
  display.setTextSize(1);
  display.setTextColor(SSD1306_WHITE);
  display.setCursor(16, 20);
  display.print("Temperature: ");
  display.println(temperature);
  display.setCursor(16, 40);
  display.print("Humidity: ");
  display.print(humidity);
  display.println("%");
  display.display();
  delay(2000);
}